Author Topic: Bristol Scout C  (Read 4303 times)

0 Members and 1 Guest are viewing this topic.

Glen

  • Associate
  • **
Re: Bristol Scout C
« Reply #10 on: September 09, 2013, 10:45:04 PM »
Thanks PJ, I appreciate it.

Glen

PJDeluhery

  • Global Moderator
  • ****
Re: Bristol Scout C
« Reply #9 on: September 09, 2013, 02:01:56 PM »
VERY nice work, Glen. From babes to biplanes - you're truly a multi-faceted artist! Well done.
BFFS Member,
N. American Rep.
If the world is wrong; then right your own self...Brother Dave Gardner

Glen

  • Associate
  • **
Re: Bristol Scout C
« Reply #8 on: September 09, 2013, 11:36:28 AM »
Hawk/Brian, thanks! I'm glad you liked it.
Casting the Scout would require a rethink on how the piece was put together. Flying and rigging wires are an integral part of WW I aircraft, but there's no way that the Scout's rigging between the upper wing and fuselage, the lower wing and wing bumper, and the upper elevator control cable could be cast effectively and consistently. Flash on a wire would be nearly impossible to remove without breaking it. I suppose you could leave the wires off and let the painter add them later, but that might be asking too much. I don't think painters are used to building a flat.
Thinking out loud here, apart from the wires, I'd also have to redesign parts to eliminate undercuts. There is actually a gap between the interplane struts and the upper fuselage decking where it rolls away from the viewer. Likewise the tailplane support struts. The gaps could probably be filled with two-part putty and/or packing pieces attached to the back. Assuming we're talking resin here, the piece would have to thicker overall (the prop and landing gear are about .010" and .020" thick respectively) to prevent warping and make the piece less susceptible to breakage while handling. Side note: the Halloween Witch is a smidge over 3/32". Too thick for a traditional flat, but fairly normal for a resin piece, I think. It has a rather hefty feel.
There's also the issue of colors and markings. Leave the piece blank and let the painter do his own? Is forcing the painter to free hand his own markings acceptable? Engrave the basic national insignia in? Engrave a specific markings set thereby locking the painter into doing a specific pilot/aircraft/unit? Um ...decals?
Then there's the issue of actually casting these. I've no real inclination to do it myself, so that means a commercial bulk caster has to get involved. Still not really interested in going into business for reasons I've outlined in the past.
Nevertheless, I'll mull on it some. Maybe try a monoplane.
Cheers,
Glen

Brian

  • Guest
Re: Bristol Scout C
« Reply #7 on: September 09, 2013, 04:32:33 AM »
Well done Glen, look forward to seeing the next aircraft and as mentioned start thinking about casting  ;)   

hawk

  • Associate
  • **
Re: Bristol Scout C
« Reply #6 on: September 09, 2013, 03:28:11 AM »
Hi Glen,

Nice work, I have a passion for WWI planes and the mad people who flew them. I have a range of bust representing British WWI aces.

Don't suppose we could get you to cast a few next time ;)

Looking forward to the next one.
John Fitzgerald
---------------------------------------------------
Hawk Miniatures

Blog: www.hawkminiatures.co.uk
Shop: www.hawkminiatures.co.uk
Follow @HawkMiniatures on Twitter
And hawk.miniatures on Facebook

Glen

  • Associate
  • **
Re: Bristol Scout C
« Reply #5 on: September 08, 2013, 12:15:29 PM »
Thanks everyone. The rigging wasn't all that difficult since only a small portion of it was visible due to the profile nature of the piece. The trick was to find thin, rigid pieces that could be measured, cut, then glued into place while holding their shape and no curving. I used small drops of superglue applied with a pin. As I mentioned, the music wire was too thick to my eye, even before I primed an painted it. A small test priming and painting confirmed it. I found the .010 plastic rod at a shop in Tulsa while attending the Tulsa Figure Show.

I have other WW I aircraft on the back burner - maybe Hawker's DH.2 (so not looking forward to rigging that!) or Richtofen's Albatros D.II - but I don't expect to get to them for a couple of months.

Glad you all liked it.

Cheers,

Glen

Nicholas Ball

  • Secretary
  • *****
Re: Bristol Scout C
« Reply #4 on: September 07, 2013, 02:55:07 PM »
There are some very very talented people on this site.

BAST**DS   ;D ;D ;D ;D ;D ;D ;D ;D ;D ;D ;D ;D ;D ;D

Very interesting to see the basic forms and the process to the finished art piece. Beautifully done and executed Glen, keep posting these little beauties, they are a joy to behold.

BAST**D   ;D ;D ;D ;D ;D ;D ;D ;D ;D ;D ;D ;D ;D ;D ;D

Re: Bristol Scout C
« Reply #3 on: September 07, 2013, 08:37:01 AM »
Nice job Glen. I was impressed with the rigging that is one of the hardest things to do on model aircraft. Willie

marko

  • Administrator
  • *****
Re: Bristol Scout C
« Reply #2 on: September 06, 2013, 11:32:32 PM »
A for cleverness on this.  Great job, nice plane.  Lanoe would be honored.


mark
« Last Edit: September 07, 2013, 10:35:24 AM by marko92 »
Site Admin

Glen

  • Associate
  • **
Bristol Scout C
« Reply #1 on: September 06, 2013, 09:06:11 PM »
This is a project that has been on-again, off-again for the better part of this year. Some recent discussions about flat aircraft prompted me to revive it. The first part of the project involved finding some decent plans/drawings and some photos of the actual aircraft. That took about an hour on the web. Once I found dimensional data, I was able to scale the drawings down to 1/48. I then started comparing drawings to each other and the photos to check for (reasonable) accuracy. Pretty much all of the drawings were in the ballpark, while photos, assuming they were captioned correctly, show that most of the differences centered around the Scout variants - A, B, C, and D. I went with the C because it was used by Capt. (later Major) Lanoe Hawker who was awarded a VC for knocking down three German aircraft in 1915. Hawker eventually became Britain's first ace. More here: http://en.wikipedia.org/wiki/Lanoe_Hawker
The project seemed simple enough. Once the plans were scaled, I traced the profile outline and various parts onto an assortment of sheet plastic ranging from .010" to .025". The parts were cut out using an X-acto knife and/or scissors. The fuselage from the cowl face to the rudder post is one piece with a second smaller piece laminated over it. The second piece goes from the angled line at the front to another point just in front of the horizontal stabilizer. Putty was added to the upper rear deck to depict the rounded top, while more putty was added to upper front deck, nose side panels and cowl. All were rounded and sanded smooth. The panel lines were engraved. The Scout was built in layers according to plan that was about 90% accurate. There were a few times that I had to backtrack and take something apart in order to fit something in.


For example...
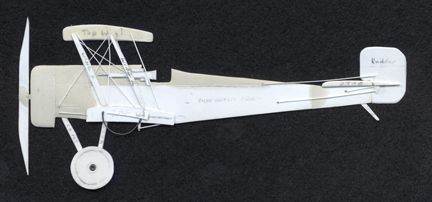
One thing I want to try was rigging. I used very thin music wire (the primered photo shows this), but it looked a bit too thick - even more so when painted. I pulled them off and found some .010" (.3mm) plastic rod and it instead. It look more to scale than the wire, but it's technically too thick. I won't quibble...


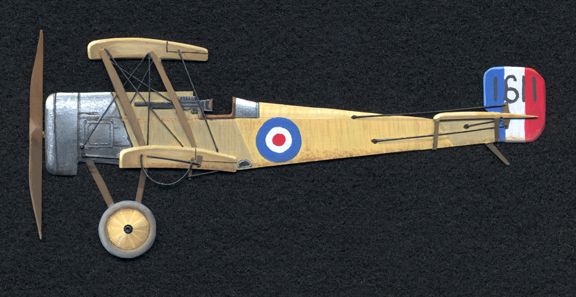
 Once together, the assemble Scout was primed with Floquil Model Railroad Primer, cut about 20-25% with lacquer thinner and brushed on (sounding like a broken record there...). The airframe is overall Reaper Amber Gold triad (depicted the clear doped linen fabric), while the metal parts are Honed Steel triad. The struts are the Shield Brown triad. The tires are the Stone Gray triad, while the hand-painted markings are Fire Red, True Blue, and Misty Gray (which is almost a dark white; I use Pure white for the highlights). The tail number 1611 was painted with a Stormy Gray and Pure Black mix. The flying and rigging wire were painted Adamantium Black (metallic black) and highlighted with a gunmetal pencil. As a side note all of the triads can be intermixed to create additional hues with the triad and lighted or darkened with other colors as needed. Great idea those triads...


That's it! As always, questions, comments, and feedback are welcomed.
Cheers,
Glen